Showing posts with label Keys. Show all posts

Friday, June 20, 2014

Toggle Viewport Visibility for Child Objects

Quick Tip:  to toggle the viewport visibility of child objects in the outliner, hold Ctrl and click on the eyeball icon of the parent object.  This will toggle the visibiltiy of all the child elements as well.


In the example above, holding Ctrl and clicking on the visibility icon for Clock object caused the visibility of the HourHand and MinuteHand to be affected.

Saturday, October 13, 2012

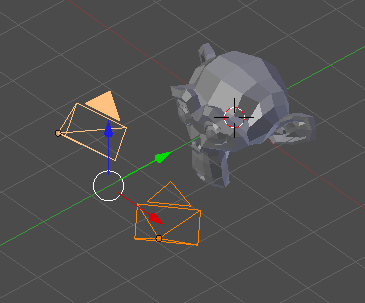
Active Camera Switch

This quick entry covers the function of switching the 'active' quality of a camera in a scene where there are multiple cameras.  With the desired camera selected press [Ctrl+NUM0].  This will set the selected camera as the 'active' camera, therefore, when you render [F12] or when you assume camera view [NUM0] it will use that active camera.

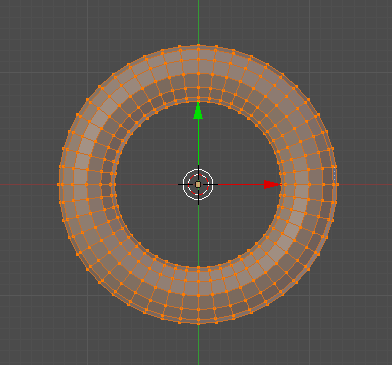
Scale along Normals

This quick entry covers the idea of scaling along the normals of a mesh rather than the standard scaling method.  The quick key for this action is [Alt+S] while in Edit Mode.  

But to explain its use, consider a taurus:

Thursday, May 31, 2012

Object Transforms

This entry is a summary of the object level transform functions.

To perform standard operations on a mesh in the Object Mode.

[G] to translate
[R] to rotate
[S] to scale

All of these can be restricted to the standard Cartesian Axis with [X], [Y] and [Z] respectively.

Specific values can be entered for more precise deltas.

Conversely dual axis changes can be applied with [SHIFT+X], [SHIFT+Y] and [SHIFT+Z]. Where the axis selected is the one that is omitted from the transform.

All transform changes can be viewed in the properties panel [N].
In this panel specific values can be set, or values can be Locked.

All transforms can be reset:

[ALT+G] to reset translate
[ALT+R] to reset rotation
[ALT+S] to reset scale

All transforms can be applied (keep but reset references) with: [CTRL+A]

Monday, May 21, 2012

Alternate Input

This entry covers some quick tips about using Blender in the less than ideal configuration.

So the ideal configuration is using a 2-button mouse with a scroll wheel, and as well as a keyboard with a dedicated number pad or NUMPAD.

There are many scenarios where this ideal configuration isn't available (i.e. ergo mice, laptop, track pad, mac etc).  So here are some quick tips for working with these configurations:

If you have a middle mouse button, and therefore can't middle click, you can emulate the 3rd button by checking the Emulate 3 Button Mouse in the User Preferences window under the Input tab.  What this does is allow you to [ALT+LEFT-CLICK] to perform a middle mouse click.

In the same window, to mitigate a keyboard that has no dedicated numpad, you can also Emulate Numpad by checking that respective box.  What this will do is override your regular number keys which would normally control your layers, and apply the NUMPAD views instead.

There are two scenarios where having a scroll wheel is very handy.  One is adjusting how many ring-loops are applied when you [CTRL+R] to insert an edge loop.  Changing the number of rings can also be achieved by [PAGE UP] and [PAGE DOWN].

This is the same as the ring loops, when working with Proportional Editing [O], Paint Select [C] or any tool that has a radius control, you would normally use the scroll wheel to adjust the size of affect.  You can also use the [PAGE UP] and [PAGE DOWN] here as well.

Note that there are known issues with Logitech Mice not functioning correctly upon first connection.  In these cases, open the Logitech driver/software, and set the Scroll Wheel button to be either Middle Button or Middle Click instead of its standard Zoom or AutoScroll.

Friday, May 18, 2012

Camera Track Object

This entry is just a simple demonstration of enabling camera tracking on an object.  This is not the camera tracking related to video footage, but forcing the in scene camera to point at an object in your scene.

This video shows a quick demo of it.  To enable the feature, select the Camera first, then select the target object.  Then enter [CTRL+T], and select Damped Track Constraint.  At this point, if you move the camera with [G], the camera will always point at the selected object.  

Also, note that if you rotate [R], the camera will always rotate according to the vector of the camera.  This feature is very similar to the idea of a Quaternion.


Saturday, May 5, 2012

Section View

This short entry shows a simple utility for viewing your mesh, which is the section view (or cutaway view).  To enable this view enter [ALT + B].  This produces an action similar to the box select [CTRL + B], except, what you select will maintain in the view, and everything else will be hidden.

In this example, I selected the right half of suzanne from the top view.

You'll notice that when viewing the mesh from the side, you can now see inside since the left side is hidden.  The section view can be turned off by pressing [ALT + B] again.

Friday, December 30, 2011

Not Axis

When restricting access in transforms (scale, grab or rotate), typically the z,x and y keys are used to restrict access modification.  

You can also hit [Shift + x], [Shift + z] or [Shift + y]  to restrict to the other two axis.  Hence, if you scale and hit [Shift + z], the object will scale in the x and y axis, and not the z axis.

Sunday, December 4, 2011

Edit Mode - Keys

MESH
Faces Menu [f]
Specials Menu [w]
Convert Tris to Quads [Alt + j]
Convert Quads to Tris [Ctrl + t]
Convert Mesh/Curve [Alt + c]
To Sphere [Shift + Alt + s]
Switch Select Type [Ctrl + TAB] //point, edge, face
Fix Normals [Ctrl + n]
Merge Vertices [Alt + m]  // collapse
Ring of Vertices [Ctrl + r]
Extrude [e]
Extrude Edges [Shift + e]  // mean crease
Select Linked Vertices [Ctrl + L] // at least one vertex selected
Select All Adjacent Vertices [Ctrl + NUM PLUS]
Deselect All Adjacent Vertices [Ctrl + NUM MINUS]

Separate as Mesh [p]
Join Mesh [Ctrl+j]

CURVES
Handle Menu [v]
Close the Curve [Alt + c]
Convert Mesh/Curve [Alt + c]

Object Mode - Keys

Move object origin to center of mesh [Ctrl + Alt + Shift + c] //origin to geometry

Move selected to Layer [m]
Convert Mesh/Curve [Alt + c]
Join Meshes [Ctrl + j]
Apply Transforms [Ctrl + a]
Link Menu [Ctrl + L]   // properties given by last selected
Group Select [Shift + g]

Application - Keys

Pivot Center to Bounding Box Center [COMMA]

Toggle FullScreen [Ctrl + UP]
Toggle Object Mode [TAB]
Toggle Edit Mode [TAB]
Full Screen (viewport) [Shift + SPACEBAR]  
Screen Layout Advance [Ctrl + Left/Right]
Separate Window [Shift + LMB Drag]

Render Scene [F12]
Cursor to Origin [Shift + c]
Snap Menu [Shift + s]
Snap Selected to Cursor [Alt + g]
Snap Geometry [Shift + Alt + Ctrl + c]
Search Menu [Spacebar]
Select All Toggle [a]
Block Select Enable [b]
Wireframe View [z]
Texture View [Alt + z]
Paint Select [c]
Proportional Editing [o]

Undo [Ctrl + z]
Redo [Ctrl + Shift + z]
Editor Panel [n]  // cursor in viewport
Tools Panel [t]  // cursor in viewport

Duplicate [Shift + d]
Linked Duplicate [Alt + d]  // change one, change all
Parent Object [Ctrl + p]  // parent is last selected
Clear Parent [Alt + p]

Look Y [NUM 1]
Look X [NUM 3]
Look Z [NUM 7]
Toggle Ortho View [NUM 5]
Focus On Selected [NUM PERIOD]
Focus And Isolate [NUM /]
Add Object [Shift + a]
Hide Selected [h]
Hide Unselected [Shift + h]
Unhide All [Alt + h]

Camera to Current View [Ctrl + Alt + NUM0]
Camera View [NUM0]

Switch between layers [1,2,3...0]