There are a number of custom nodes that are developed out in the community that can be used to simplify your life, or add a functionality you never had before. One example is this NodePack by BWIDE: https://bwide.wordpress.com/node-groups/bwide-nodepack-for-blender/
Showing posts with label Material. Show all posts
Showing posts with label Material. Show all posts
Friday, May 23, 2014

Monday, April 14, 2014
Shadows Only
There are many situations where it would be helpful to only render the shadows received upon an object rather than the whole material itself. There is a simple way to do this within Material>Shadow section, shown below. Simply check the Shadows Only box.

Sunday, October 6, 2013
Ceramic in Cycles
A quick entry on how to create a simple ceramic material like the one shown below.

Node setup is a simple combination of a Diffuse and Glossy, with the Mix Shader Fac biased toward the Diffuse. The effect looks most convincing when there is a distinct light source, as opposed to the scene being lit by a texture.

Note also that the Roughness of the Glossy is set to zero.
Saturday, September 14, 2013
Invisible Emissive Material
In the Cycles renderer, let's assume that you want to light your scene with an emissive mesh, however, that mesh is in the way of how you want to view the scene. Hiding the mesh will also remove the light effect, so we need to make the object invisible to the camera, but still light the scene.

With the emissive object selected, in the Object panel, under Ray Visibility, uncheck the Camera box.

Friday, December 7, 2012
No Shadow Object
This quick tutorial just shows how to render your material without casting a shadow. This only applies to the Blender internal renderer materials.

Simply uncheck the Traceable checkbox. Now, the mesh should not cast a shadow on other objects.
Simply uncheck the Traceable checkbox. Now, the mesh should not cast a shadow on other objects.
Saturday, September 22, 2012
Light in Glass - Cycles
For this entry, we'll go over a trick for having a light shine through glass efficiently in Cycles. For this example, we'll have a simple setup of a oval sphere emitting from inside a regular sphere (which has the glass material), and a torus around it to receive the light through the glass.

When normally just applying a Glass material to the sphere, the problem arises that the light cast on the surrounding area is very noisy. This is due to the fact that Cycles is trying to do a lot of intense math to try to get the lighting realistic. This method of rendering can take a very very long time.

The quick trick is to use the LightPath node combined with a Mix Color node set to Add and a Factor of 1.0. When combining this with a Transparent Shader, the resulting render is one where the light coming from the emitter is correct as it passes through the glass to the camera, but for the light that passes through the glass to the rest of the environment, it's as if the glass isn't there, leaving much faster rendering times and much cleaner image.

New render with this more sophisticated node setup.

Friday, September 21, 2012
Material Mask - Cycles
This entry will cover the function of creating a material mask using an image texture. Our starting model is a simple sub-surfaced cylinder with a uv-mapped texture on it.

Using the following material node setup, we essentially are taking a second texture and masking out parts based on luminance. A bright magenta is used to show what would normally be another texture showing through. The ColorRamp node converts the output of the texture to black and white, while the sliders allow you to control what parts of the texture will show through.
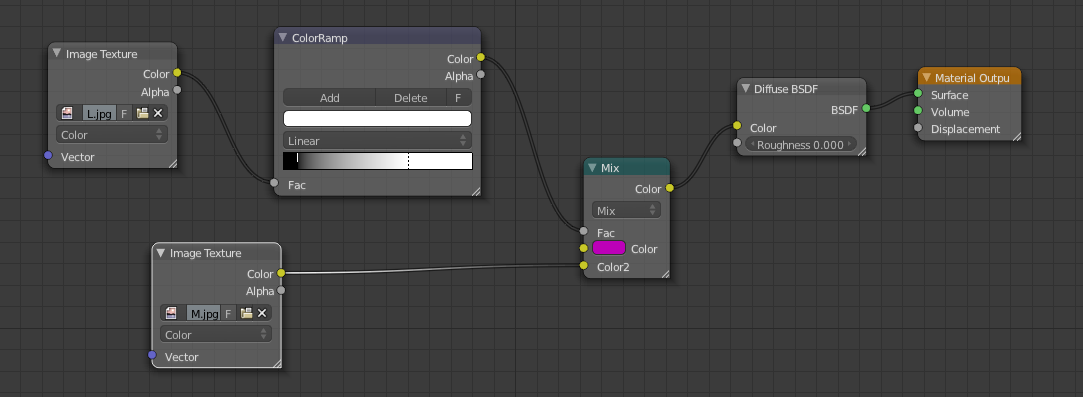
An example of the cylinder now masked showing some magenta areas through.

Taking this node setup further, the output from the ColorRamp can be fed into a Mix Shader to also act as a mask for another shader (in this example a Glossy Shader). A Mix Color node must be placed in between to control the strength of the second shader. The second color of the Mix Color node must be set to black, acting like a scale between black and the full white from the ramp.

The result of this setup is as shown below, where the glossy is only affecting the areas that are masked per say.

Saturday, June 9, 2012
Edge Glow
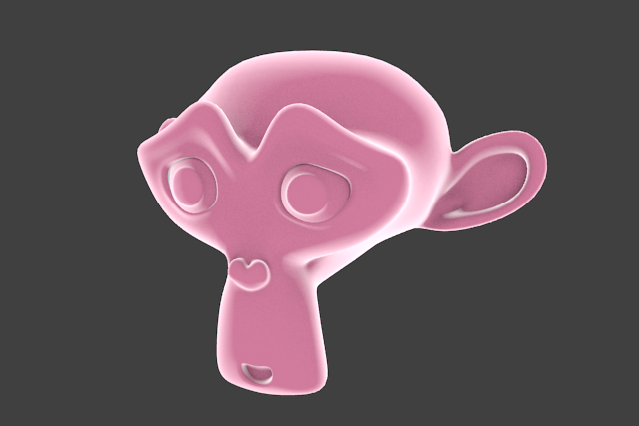
This entry covers a unique material that was created by the folks at CGMasters: CG Masters Website. They refer to it as a falloff technique. The node setup can be seen below.

I tried it on Suzanne, but was only successfully able to recreate the effect using the node setup rather than just the ramp settings in the right panel.
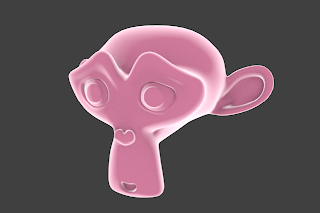 Also, note that to get this edge glow effect, I had the scene only lit by Environment Light. I didn't have any active lamp in the render.

I tried it on Suzanne, but was only successfully able to recreate the effect using the node setup rather than just the ramp settings in the right panel.
Sunday, May 20, 2012
Texture Atlas
This entry will cover a very important technique for providing improved texture detail on meshes for gaming purposes while minimizing the number of materials needed. In gaming it is very important to have as few materials as possible, as every unique material in a mesh requires a separate 'Draw Call'. So if possible you want to combine your materials into one single map (or Texture Atlas).
In our example I've started with a sphere that has been UV unwrapped via a seam [CTRL+E] around the equator.

I applied two different materials, one a brick image and one a rug image. So to begin, we have a single mesh wit two materials, each with their own image texture UV mapped onto the sphere. The goal is to combine these two materials into one.

To combine the two, we will essentially be baking the rendered textures onto a new UV map on the sphere. So on the mesh tab, press the [+] button on the UV Maps panel, and name the new map. In this image I named it 'BakedUVs' but later I'll refer to it as just 'Baked'.
Note: For the baking to work be sure that the new UV map 'BakedUVs' is selected.

At this point, go to the UV Editor [CTRL+LEFT] view, you can view the UV unwrapping for this new UV map. You can change it, but I've had the most success just leaving it the same as the original. However, you do need to create a new image. This should appear as a black square behind your map.
Also note that the mesh must be selected (highlighted orange) while in this view (as shown below).
Also note that the mesh must be selected (highlighted orange) while in this view (as shown below).

Next is the baking, but before you move onto this step, in the case of a sphere, to make the texture looking cleaner and smoother, I applied a subsurf and smooth shading to it. The baked textured will be based on the render, so any of these features will be applied by the bake.
Go to the Render Tab, and at the very bottom you'll find the Bake section. You don't need to change any parameters just hit Bake.

If you return to the UV Editor window you should now be able to see your new texture baked onto the new image. This now has both materials on one texture, and the lighting from the rendered scene can now be seen (most obviously on the brick side of the texture).

Note: Make sure to save this new image.
The following steps will simply show how to reduce your materials down to one to be transferred into a gaming engine such as Unity. You may want to save as a different filename to preserve the original two-materials in case you want to change it and re-bake.
The first step is to remove the other (original) UV map and just keep the new baked UV map.

The next step is to create a new single material, so the other two can now be removed.

Finally, on the new material, add a new texture and assign the new Texture Atlas which was created from the bake, and make sure the new UV Map is selected.

Now when rendered, you have both textures/materials applied while using only one material.

The ultimate benefit now is if you export the file to an FBX and transfer the model with its texture into Unity, you can get the same texture detail, now with one UV map and one material. Note in the stats window that the draw call is only 1.

Friday, April 6, 2012
Transparent Decal
This entry will cover a simple approach to applying an image (PNG) with transparency to a material that has color. The image with transparency is the eyes seen below.

We'll be applying these eyes to a segment of the cylinder, and we've isolated the segment by highlighting the surrounding edges as shown below.
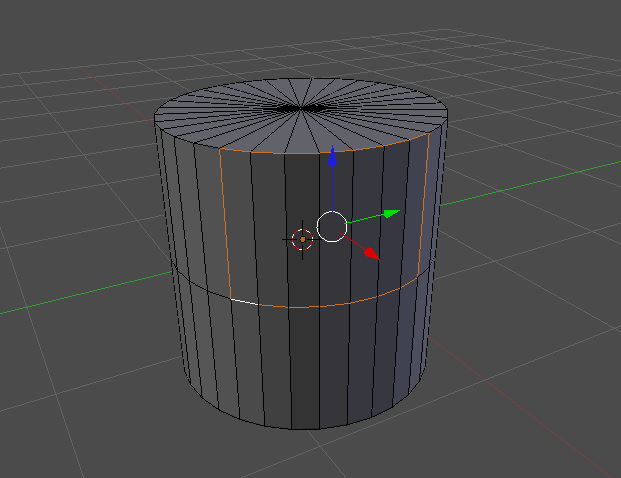
These edges will be made into a Seam so that we can find them in the unwrapped map easier. This can be done with [Ctrl + E], and selecting Mark Seam. Note that breaking the mesh into UV islands is not recommended for models to be used in real-time (gaming) applications.

Once the vertices are marked and the mesh is unwrapped using the standard [U] and Unwrap, moving over to the UV/Editor [Ctrl + LEFT], should show a UV map similar to the one below. Our seams are now very obvious to find.

Since we only want the image to display in our segment, we'll enlarge it accordingly and move all the other elements of the mesh outside of the image.

Back in the standard view, create a new material for the cylinder, and add a new texture. In the texture properties, all you need to do is set the Extension to Clip, and ensure the Coordinates are UV and the Projection is Flat. No further fiddling with transparency is needed. The transparency is covered automatically.

The final render with the eyes textured onto the cylinder.

Wednesday, March 14, 2012
Shadeless
Rendering an object with a Shadeless material essentially allows the full color of the color or texture to visible, without any interaction with the rest of the lighting in the scene. This is most often used in cases of background images, and with creating color masks within a scene.
In the Blender Internal this is done quite simply by checking the Shadeless box in the Material tool palette (as seen below).

In Cycles, it is a little more cumbersome, and the node setup (below) must be used. Essentially what's going on here is that the material is set to Emmissive, but to prevent it from lighting other objects in the scene, the light paths are isolated to only casting toward the camera.

Tuesday, February 21, 2012
Material Viewport Color
This entry will explain a simple concept of material identification, as well as touching on a special surface in Cycles called the Holdout.
FOR CYCLES:
In the initial viewport we have 3 cubes that have different colors. However, these colors are not representative of what the render will look like.

In cycles, in the material panel, you'll notice a field called Viewport Color. This is what the object will be colored when viewed in Solid render mode. In this example, the red is obviously the cube in the middle. You'll notice however, that the actual shader or surface used is Holdout.

When we view the rendered image, we see three boxes with three unique materials, none of which are colored. The 'blue' box has a Glossy shader, the 'red' has a Holdout, and the 'green' has the Emmisive shader. It's worth noting that the Holdout shader is essentially the opposite of the emmissive shader. As the emissive shader emits light, the holdout shader actually absorbs all light and reflects none.

Storing Materials
Typically Blender only saves materials that are associated with a mesh.
This entry will show a quick way to save a material within a blend file without it being associated with any particular mesh.
In the material panel, the little F button means you want to 'fix' the material to the file even if it's not associated with a mesh.

Sunday, February 12, 2012
Alpha Texturing - Cycles
This entry will walk through the process of applying an alpha texture such that the lighting in the scene reacts to the transparency. This tutorial is specific to the Cycles renderer, for the Blender Internal approach, go here: Alpha-Texture Internal
Our starting scene just has two planes, one with the image (containing transparency) and the second acting as the background.

The compositing view for the material is shown below. Note that there are two image textures. I'll describe the two images that are needed next.

Our original image which connects to the Diffuse BSDF is the original image with transparency. This was simply a PNG of the blender logo.

The second image that flows into the Transparency BSDF node, must be a grayscale image representing the alpha channel. Black is opaque and white is transparent (with gray being in between values of transparency). This image must be generated in an image editor and imported separately.

The final rendered result shows the transparent plane hovering over the background. Note how the light respects the transparency and the shadow matches the shape of the image rather than the rectangular plane that it is resident on.

Saturday, February 11, 2012
Specular Texture
This entry will walk through setting a material with a specular texture. This is most often useful when creating a material where the surface has either very complex specularity such as scratched metal, rough surfaces, or in this case snow.
Below is the starting mountain scene which we will give a snow-like material.

For the landscape object, create a new material, and set its Specular Intensity to 0. This will prevent the material specularity from overriding or overpowering the texture specularity. The Hardness however, will still be used to control the level of spread of the specularity among the material.

Next create a new texture. In this case, I used the Clouds texture built in and set the following parameters.

Then, under Influence, enable the Specular Intensity, and adjust its value for strength of the reflection.

Since we are using the Blender internal renderer for this example, to get the specular texture to show correctly, a second light is needed to focus just on the specularity of the texture. Hence the second light is setup to only affect Specular (Diffuse has been unchecked).

This results in the following render, where you can see the white material, now has some shiny noise on it, indicative of the noise specularity of snow.

Subscribe to:
Posts (Atom)