Showing posts with label Lighting. Show all posts

Saturday, September 22, 2012

Light in Glass - Cycles

For this entry, we'll go over a trick for having a light shine through glass efficiently in Cycles.  For this example, we'll have a simple setup of a oval sphere emitting from inside a regular sphere (which has the glass material), and a torus around it to receive the light through the glass.

When normally just applying a Glass material to the sphere, the problem arises that the light cast on the surrounding area is very noisy.  This is due to the fact that Cycles is trying to do a lot of intense math to try to get the lighting realistic.  This method of rendering can take a very very long time.

The quick trick is to use the LightPath node combined with a Mix Color node set to Add and a Factor of 1.0.  When combining this with a Transparent Shader, the resulting render is one where the light coming from the emitter is correct as it passes through the glass to the camera, but for the light that passes through the glass to the rest of the environment, it's as if the glass isn't there, leaving much faster rendering times and much cleaner image.

New render with this more sophisticated node setup.

Friday, January 6, 2012

HDRI Image Lighting in Cycles

This entry essentially shows the steps of creating environmental lighting for a scene using an HDRI image.  This is the same concept as is introduced in this entry HDRI Lighting, however, you'll quickly note that this is much easier and simpler to do with the Cycles render engine.

So we start off with a simple scene with a smoothed sphere.

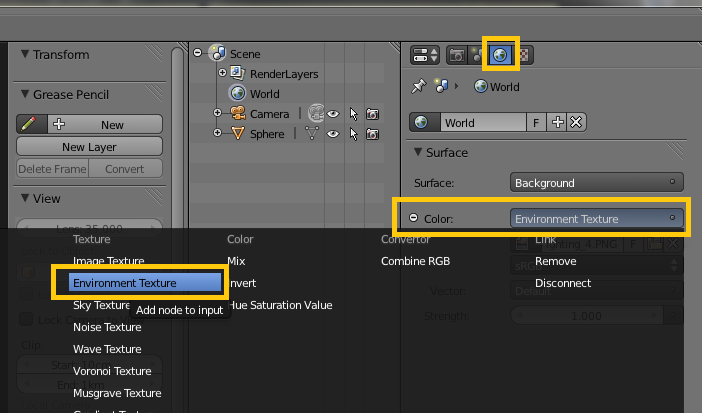
In the World tab, simple select Environment Texture for the Color, of the Background.  Select the desired HDRI image, and that's it.

Now that image will render as both lighting and the background for the scene.

HDR Sphere Image

There will be times when you want or need to use environmental lighting (rather than Blender light source), and therefore will need an HDR image.  Many scene type HDR images can be found online, but there may be times when you want an image of a specific scene.

Typically this would be achieved by taking a series of photos where the camera is rotated (ideally) around the the central node of the lens.  These images would be stitched together to create a 360 panorama.  This option isn't always available. 

Another simple approach that would give you a 180 degree solution is to use a mirror ball (or christmas ornament), and do some manipulation.  This entry will show how to convert a mirror ball image into a rectangular background which could be used in blender for lighting, such as Cylinder Lighting, or HDRI Lighting.

So first we start out with a mirror ball-like image.


The program of choice is to use HDR Shop, which can be found here: http://www.hdrshop.com/

Load the image in this program, and it should look something like below.

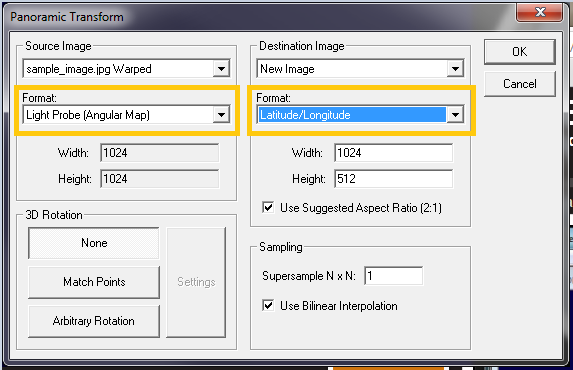
Next, open the Panoramic Transformations dialog.

Apply these changes and hit OK.

Next, open the same dialog, and now apply the following changes, and hit OK.

Now the image should be nicely unwrapped to a 180 degree pano of the scene.


Thursday, December 29, 2011

Cylinder Lighting

This is a nifty approach to creating simple environmental lighting using a cylinder and the Cycles render engine.  

First we start off with our HDR or sky image.  These can be downloaded from many sites online.  See the one of the Links entries for more information.

First create a cylinder (without ends capped) and wrap your scene with it.

Next, take a side view [NUM 1 or NUM 3] and, in edit mode [TAB], hit [u] for the UV menu and select Cylinder Projection.

Next, switch over to the UV Edit view [Ctrl + LEFT].

Select Clip to Bounds to automatically have the mesh fit the image box.

Because Cycles renderer does not support image assignment to UVs yet, switch to the Blender Renderer.

Now select the image from the beginning and load it into the UV map.

Adjust the mesh so that it fits the image.

Now the cylinder can use an emmissive image texture to create light for the scene.  You can follow this entry for that: Emmissive Image

Wednesday, December 21, 2011

Mist

The Mist attribute within the World settings allows you to add a gradient mist or fog to your scene based on where your camera is facing.  In showing how this works, I'll use a scene generated with the Suicidator City Generator.

At first render without the Mist, I've applied environmental lighting and a very light gray sky color, commensurate with a very over-cast (seemingly) foggy day.  The fog will be added by the mist.

Now enable Mist within the World properties panel. See the image below for a visual explanation of how the mist works.  I typically start with a very low Start value and a very low Depth value, and adjust as necessary till the scene looks correct.

From the diagram below, you can see that the Start is the point from the camera which the mist begins, and the depth is the z-distance in which the fog becomes thicker with respect to the Falloff relationship specified.

The final render with the Mist enabled gives a very nice foggy feeling, almost San Francisco style. There isn't even a need to try to put anything else in the background as the fog seems to absorb it all.


Wednesday, December 14, 2011

HDRI Lighting

This tutorial covers lighting a scene using an HDRI image.  Technically any image can be used, but the term that is commonly used for this is referred to as HDRI.  Essentially, what works best is a seemingly 360 pano image.  It doesn't have to be HDR.  

So to setup the scene, first remove any lamps, unless you desire extra light on top of what will be provided by the scene.

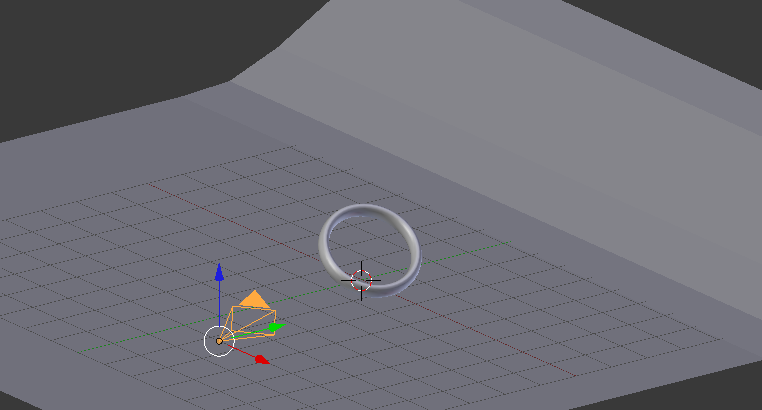
Select the world tab, and make the following parameter changes.

Next download an 'HDRI' image that you find online.  The following one is suitable for this application.  


Next, select the camera and add a texture to it.  Apply the following settings to the new texture, loading in the HDRI image you found.

 Upon rendering the scene, you'll notice now that the entire scene is lit based on the luminance and color of the pixels as applied to a sphere around the world.

If we apply a reflective material to the ring, we now have a gold looking shiny ring, with seemingly meaningful and realistic reflections applied to it.  This works well for very realistic scenes with reflective objects.

Saturday, December 10, 2011

Lighting with Layers

This entry explains a simple concept of isolating lamp effects to certain meshes by using layers.  You can isolate a lamp to only effect meshes on a specific layer (with the lamp on the same layer), if the This Layer Only box is checked on the lamp.


Sky Lighting

The following screenshot shows how to apply world settings to give a generally realistic sky type of lighting (for outdoors scenes).  This set of setting comes from a tutorial from BlenderGuru.com (andrew price).


Note, you still need to have a sun-lamp in the scene to provide sun lighting.