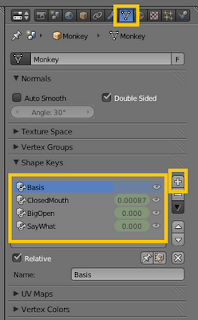
This entry will show how to apply Shape Keys. This capability is most commonly applied to face manipulations to animate expression and talking for characters, but essentially it can be used whenever mesh deformation states make up the define the nature of the animation. No rigging is necessary for this.
Note that shape keys can also be applied to Curves even though it isn't shown here.
So to start, we will use the monkey and animate its face using shape keys.
With the Monkey selected and in Object Mode, go to the Object/Mesh pallet, and in the Shape Keys section, click the plus button. The first item displayed should be called Basis. Click the plus button again, and this should create a second entry. Select this entry, and now you can name this entry whatever you like, then move to the model.
In Edit Mode [TAB], you can now edit the mesh to capture this Shape Key state. Note that since the normal shape is captured in the Basis key, anything done here will only be applied to the new key. When you are done return to Object Mode [TAB]. Add as many Shape Keys as you like repeating this process.
To create shape key - keyframe, select the one of the shapekey elements in the pallete view and adjust the value (0 to 1.0) and press [i] and this will capture the value for that animation frame.
Next switch to the Animation View [Ctrl + LEFT].
Change the DopeSheet view to show the ShapeKey Editor.
In this view, you can animate between the Shape Keys by simply selecting a point on the timeline, and adjusting the scale amount (green numbered box) for each Shape Key. In this way, you can combine Shape Keys and combine them in unique ways.
The final animation for this example can be viewed below:


No comments:
Post a Comment