This entry will cover using the Array Modifier as well as a rotation Constraint to make a rotationally, symmetrical object, by editing only a small part of the mesh. The example given is with creating a snowflake.
First step is to create an Empty. You can use any type, i used a cone because the tutorial i watched did so.
With the
Empty selected, press
[Ctrl+Shift+C] to bring up the constraint menu, and select
Copy Rotation.
Next add a
plane and offset the mesh so that one of its corners is at the center of the
Empty. This will be the point about which the mesh rotates. I elongated the mesh to make it easier to see the rotation effect.
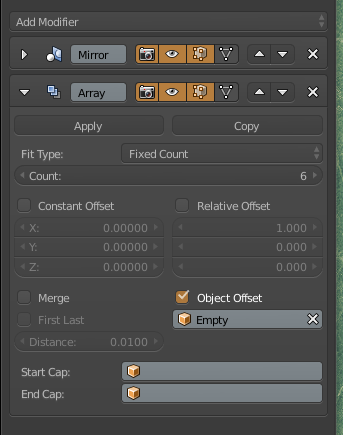
With the mesh selected (but not in edit mode) Add a
Mirror Modifier (default setting). Then add an
Array Modifier with the settings shown above. Note that you need to uncheck the
Relative Offset, and you have check
Object Offset, and apply your
Empty to the object box below it.
Now select the
Empty and rotate
[r] it 60 degrees (this can be any value, but since we're doing a snow-flake it should be 60) along the z-axis. At this point you should have the general shape shown above.
Now you can mold that one small plane into the shape you desire to create your snowflake. Notice how only the portion highlighted in orange is modified, yet gives the entire snowflake shape.


No comments:
Post a Comment