Although stacking modifiers on a mesh is a fairly elementary concept, here I'll show the power of stacking modifiers to make a very elaborate design from a very simple base mesh. This came about when I made a nerf trophy that would be 3D printed. The red region (honeycomb shape) is what will be made.

The base mesh is a simple hexagon created by adding [Shift+A] a cylinder setting the vertices to 6 and making the ends open. Duplicate [Shift+D] this shape while in edit mode and align it as shown below. This makes the pattern repeatable with the first modifier.
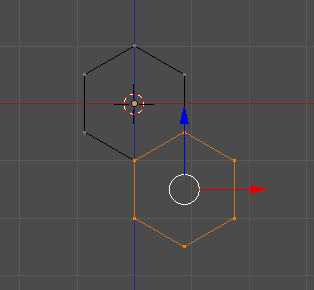
Apply two sets of Array Modifiers at this point. It will take some time to get the offsets right so that the meshes line up, but once they are lined up, you'll be able to grow this pattern as large as you like.

Next add a Solidify Modifier. This gives the flat hexagons some volume. Adjust the thickness field as desired.

Next add a Sub-Surf Modifier [Ctrl+2] (I like to use level 2). This is needed to allow for smooth bending when we form this pattern into a cylinder, and for giving it that hour-glass figure.

Note that in applying sub-surf this turns the hexagons into circles. Although tedious, the original shape can be reformed using loop cuts [Ctrl + R] on all the edges (sliding toward the corners).

At this point you can add a Bezier Circle to the scene, and add a Curve Modifier to the mesh. Once you select the Bezier Circle as the modifier object, you should see the honeycomb pattern now wrapped around the circle. Adjusting the scale of the circle will allow you to close the loop of the hex pattern. Conversely you can also update your Array Modifier to add more rows or columns.

Next, add a lattice, and adjust its scale (in object mode) to encompass the newly shaped mesh. Add a lot of rows in the W field in the lattice panel.

Now add a Lattice Modifier to the mesh, and set the object as the lattice you just created. At this point, if you edit the lattice and scale the middle segment (with proportional editing [O] turned on) you can create the hour glass figure.

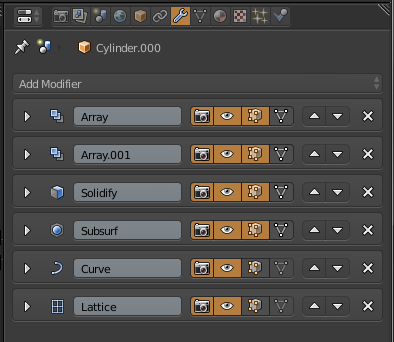
In the end you have a very sophisticated mesh all derived from a simple pair of hexagons, but with a handful of stacked modifiers.

The final set of modifiers and the order in which they were applied.
No comments:
Post a Comment