This technique is found in characters like Pocoyo or the Lego movies.

For this example, here is the starter bust model, and I'll animate both eyes and a mouth on it.

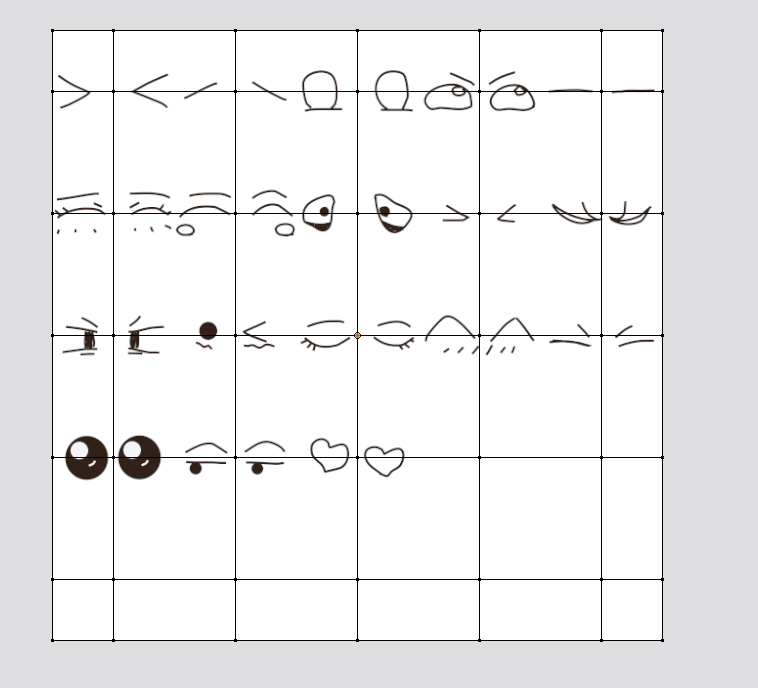
Before you get started, you'll need a map of what you want to animate. In my case I have a grid of mouth images and eye images. For this approach it is helpful to have square images arranged in a grid, and to have the images precisely aligned within it. I created the series of images using a Pen Tool in my image editor -- all 500x500 each. Then I used the following Python Script to arrange them into a single png.
These are a series of classic "Chibi" mouths and eyes that I drew. Feel free to use them for your practice.


Next you need to map out the separate regions of the face that will be allocated for the eyes and the mouth.

Each of these sections will need to be individually UV unwrapped, and given a unique material. I have found it easiest to use the [+] and create two empty UV maps first, then with each selected, select and unwrap the vertices on the model.


Recommended node setup for the Eyes and Mouth material. The approach allows the texture to be mixed with the "skin color". Note that the emission shader is needed to ensure the color of the texture comes through.

At this stage, you should have a bust model that has an initial face.

Next we need to create the texture maps which will be used as the "control" for changing the texture reference. This will be a mesh plane that will have the same textures as the bust model. This is where things get very specific, and every detail matters.
Add [Shift + A] a new Plane. You must change the size so that it has dimensions of 1x1x1. This will alter the scale. The scale needs to be applied [Ctrl + A] and select Scale. This should set the current scale also back to 1:1:1.

Setup the plane to take the same Eye or Mouth texture images used in the bust model. In my case when I applied the material it wasn't rotated correctly. Correct this in Object view (not in Edit mode). Recommended material for the map. Note you will need to UV unwrap the plane to see the texture in the 3D view. Change the display mode from Solid to Material to see it while you are editing.

The next step is to facilitate aligning the texture map reference using the "snap to vertex", but it isn't required. With the map plane in Edit Mode, Apply [W] Subdivide. Increase the number of divides so that the edges run through the middle of each individual mouth/eye image.
Then selectively remove the edges that don't pass through the middle of a set of eyes/mouths. The final vertex/edge design of the map should look as follows. This is most easily achieved by selecting the edges you don't want and dissolving [Ctrl + X] them.
Do the same for the mouth map.
Select the vertex of the eyes that you are using as the default on your bust model. Next move the blender Cursor to that location [Shift + S] Move Cursor to Selected. This will allow you to add your texture reference (which will be a bone), right at that point.
Leave Edit Mode for the plane, and add [Shift + A] an Armature. This should place a bone at the point where the cursor was placed. While in Edit mode of this armature. Rename the armature "Armature Eyes" and name the bone "BaseBone-Eyes". While still in edit mode, add another bone called "TargetBone-Eyes". You can shrink these bones to make them manageable.
What's happening here is the delta location between the Base and Target bones will be used as a delta for the UV map texture on the bust model. This is achieved through the magic of the UV warp modifier.

Back on the bust model, add the UVWarp modifier. In the parameters at the bottom add all the different parts of the armature into the fields as shown below. Note that the UV Map must also be specified (in this case eyes).

At this stage, put the Armature Eyes in Pose Mode [Ctrl + Tab]. The bones should be cyan colored. As you move the TargetBone around you should see the texture on the bust model change. If it is not changing then something in the previous steps went wrong.
If you turn on snap settings (the magnet icon), and set it to Vertex, you can now leverage the vertex locations you created on the map. When you move the target bone with this turned on, it should snap to the exact middle of each eye or mouth image, making it really easy to change the look.

Depending on how the images came in, you may have to rotate the Armature so that as you move the Target Bone it matches what you see on the face. In my case, I had to rotate it on the Z axis, and flip it over. Make these translations to the Armature while in Object Mode, not in Pose or Edit mode.

Once this is working for the eyes, repeat the same steps for the mouth. Creating a map, an armature with bones and adding it as another UV Warp modifier. So at the end, your bust model should have to UV Warp modifiers on it like shown below.

Next to animate, you'll want to open the Dope Sheet view. In this view, you can add [i] keyframes for the posing of the bones for the eye map and the mouth map.
To make the transitions between different images crisp you need to set the interpolation to Constant through the menus shown below Key > Interpolation Mode > Constant.

Add keyframes changing the eyes and mouth. Create blinking or even sync it to speech.

Normally there would be a video of the finished result, but currently embedded video doesn't seem to work in this blog. May need to create a youtube page so can link these kinds of videos.
No comments:
Post a Comment