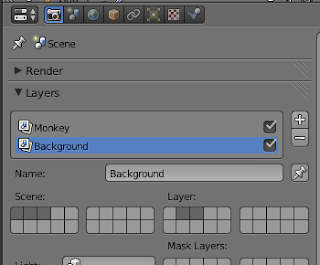
This entry covers the use of Render Layers. Although there are probably many uses for Render Layers, the main focus I'll cover is using them to isolate post processing control to individual objects of the scene using the compositor.
So in my initial scene, I have Suzanne and a light blue backdrop. In an effort to use Render Layers, I have Suzanne on layer 1, the backdrop on layer 2 and the light on layer 3.
Now in the Render tab, I've created two different render layers, named Monkey and Background. The Scene squares represent all the layers which will be considered in the render. Changing these will change it for all the different render layers. The Layer squares specify which layers apply to that render layer.
So in this first case, globally frames 1-3 are applicable, but for the Monkey render layer, only layers 1 and 3 are relevant.
In the same way, for the Background render layer, only layers 2 and 3 are relevant for that render layer. However, all three are still selected for the Scene.
Before making the initial render, the transparency of the layers must be set.
For Blender Internal renderer, the Alpha combo box must be set to Transparent in the Shading section of the Render panel.
For the Cycles renderer the Transparent checkbox in the Film section of the Render panel must be enabled prior to rendering. As well, before any compositing work can be done on a Cycles scene, the scene must be fully rendered [F12] first.
Now in the compositor view, you'll notice one of the first nodes that is available is the Render Layer node. Since we have two render layers, that one node can select either render layer to display. In this case below, the Monkey layer is selected. However if i switched it to Background, only the background object would render.
Using the following node configuration, you can take advantage of the transparent areas of the render layer to combine them into the complete scene of Suzanne and the background. Use a Color>Mix node to combine them, and use the Alpha to mask the transparent areas of the Monkey render layer.
Finally, in the Render Image view, you can switch between viewing the rendered layers as well as the composited scene through the menu at the bottom.


No comments:
Post a Comment