Wednesday, December 28, 2011

Extrude Along a Curve

This entry covers the topic of creating curves with body, or more simply cables.  In this example I'll make a round cable, but any shape (that is a curve) can be used.

In the viewport I have two curves, one is a circle, which I'll call CableWidth, and another curve which is just a arbitrary shaped curve which I'll call CablePath.

What we want to do is give our CablePath some body in the shape of the CableWidth.

First the circle (or CableWidth) must be a curve.  If it is a mesh, use [Alt + c] to convert it to a curve.

Next, select the CablePath, and on its Curve tab, set the Bevel Object to the CableWidth.

The CablePath should now have shape, and you can adjust the shape by adjusting the CableWidth.

Tuesday, December 27, 2011

Background Image

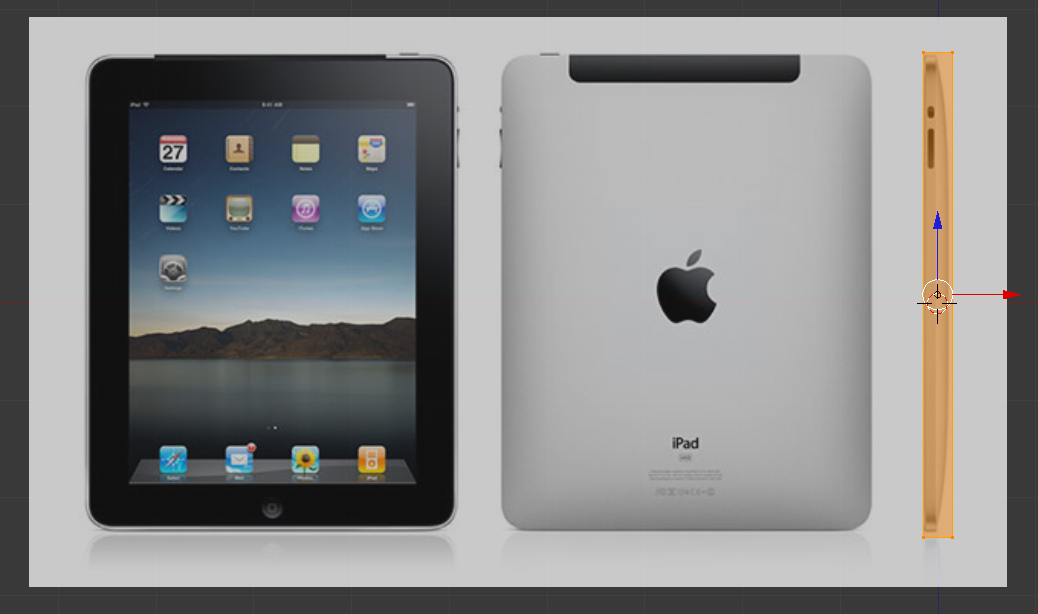
When modeling an object that already exists, it is very helpful to have reference images.   A reference image like the one below for an Ipad is ideal because it gives multiple orthographic views of the object from different sides of the object.

This entry will show how to use an image such as this as an aid for modeling.


In the properties panel [n], near the bottom is section for Background Images.  Select it, and click the Add Image button.  By default the image will be available in all standard numpad views (left, up, front, etc).  The catch is, the view must be orthographic [NUM 5].  Having a single background image shared for all axis is fine for a single view reference, but often times you'll need to have your mesh aligned (in this case) to different parts of the image.  

To have independent views for each axis, simply set the Axis field to the desired view.  In this example, I created two background images (using the same file above), and set one to the Right view and one to the Front.

Use the X and Y sliders at the bottom of the panel to adjust the location of the background image so it's aligned with the mesh.  It is preferred to move the image rather than the mesh.


For the right axis view, notice how how the image is aligned so the mesh fits right over the side view.

For the front axis, notice how the front part of the ipad is aligned with the front of the  mesh.

By using the image, the dimensions of the ipad are now correct and applied to the mesh, even without measuring.

Anytime you view the mesh from a view that is not orthographic, or is not one of the primary axis views, the background image will be hidden.  As well, the image will not be rendered.


Monday, December 26, 2011

FPS

Just a quick note that the frames-per-second (FPS) in blender animation is 25.

Hence the default timeline is 250 frames, or 10 seconds.

Emmissive Image

This entry will show how you can create a light source from a texture in the Cycles renderer.  For this example, I'll create a very rudimentary moonlit ocean scene.  To start off, I downloaded and modified a nice image of a full moon.  The moon will be the light source in the scene.

Next I modeled the scene as a series of deformed planes to make the ocean, and a simple plane as the backdrop.  I used the Image to Plane add-on to get the right dimensions of the background.

For the material of the background I selected Emission, and then for the color selected Image Texture.  From here I was able to select my night moon image, and increase the strength a little bit.

The final rendered scene, with the moon acting as the sole light source, save for the background lighting color which I made a dark blue (to color the water).


Mix Shaders - Cycles

This is a quick tip of for extending the Materials diversity when using Blender with the Cycles render engine. To demonstrate this, we have a somewhat melted cube looking subject, with a reflective floor and an emmissive background.  The back wall is the sole light source, with an Emmissive material, and the ice cube has a solid Glass material.  The floor however, we want to be Glossy, but not perfectly glossy, something in between that and a Diffuse.  So we we use the Mix Shader material.

Instead of using one of the standard built in Materials, simply choose Mix Shader, and you can select two of the standard types and blend between them adjusting the Fac: value.

The final render of this simple scene shows the glass cube, the emmissive background, and the half diffuse, half glossy floor.

The inspiration for this entry came from http://www.blenderguru.com/videos/create-a-realistic-water-simulation

Friday, December 23, 2011

WireFrame Render

Modifier
With the newer versions of Blender (2.70 and up), the wireframe can be applied via a modifier.  Since it's a modifier, it applies for both renderers.

In the modifier menu, it is under the Generate column.


This produces a wireframe of the mesh you have selected.


The attributes of the wireframe can be modified in the modifier panel.  The most common would be also turning on the original mesh, which can be done by unchecking the Replace Original field.


An example final render of the wireframe (material offset 1) and the original mesh.


Cycles Renderer

This entry will detail the steps to render a clay and/or wire render of your mesh.  The first is the Cycles approach which makes use of an add-on which can be found here: Blender Artist Forum

For this example, we'll use suzanne as our complex mesh.

After adding the add-on, when you select a mesh, you'll notice in the left-pane toolbar that these options are available.  Selected Meshes will apply the clay material to selected mesh, and Create Wire Object will create a separate object that is the wire frame of the mesh.  Click Apply Materials for this to take effect.

Note once again, a new clay material is added to the Monkey, and a new wire_object is created as a separate curve.

Render of wire curve and clay material.

Render of only wire curve, but with an emissive material.


Blender Internal
Same concept but for the Blender internal renderer.


To render the mesh wireframe, simply create a new Material and press the Wire button shown below.  To get even fancier, you can create two materials, and assign both to the entire mesh to create a solid with a wireframe (last image).

Solid with wireframe render.


Wednesday, December 21, 2011

Clay Rendering

At times it will necessary (or just cool) to see the scene rendered without textures or materials.  If you are really good at faking reality, some will ask for a "clay render" to verify that your image isn't a photograph -- that's when you know you are good.

So instead of having to create a new blank material and manually apply it to every object in your scene, there is an AddOn which will do it for you.

This AddOn can be found here: ClayRender.py

To demonstrate how simple and effective it is, I'll start with a city scene that is already textured (generated by Suicidator City Generator).

After the AddOn is installed and enabled through the User Preferences menu, on the Camera tab there is now a new section under Render where you can enable Clay Render.

Enabling Clay Render and re-rendering will give the following perfectly non-textured image.