Showing posts sorted by relevance for query scene. Sort by date Show all posts

Saturday, June 23, 2012

Scenes

This quick entry covers creating new and deleting Scenes.  In most cases have one scene will suffice, except perhaps if you are trying to contain a small movie in a single blend file and you want to have different scenes with unique models, lighting, world data, etc and Layers won't suffice.

In this example, we start off with the default scene which generally comes with the following objects:

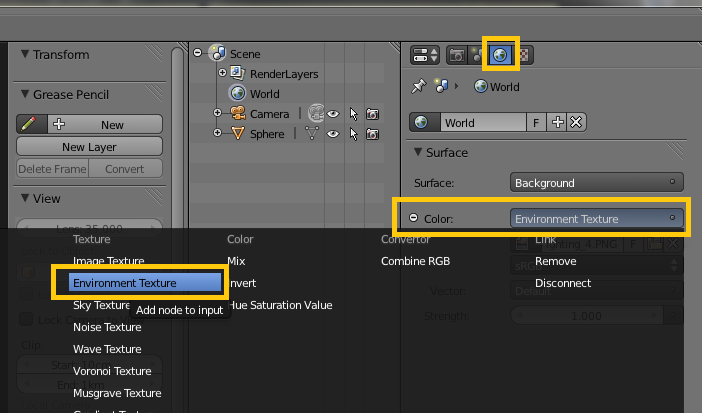
In the primary menu system in the upper left, you can find a box as shown below.  Clicking on the plus button will allow you to create a new layer, either from scratch, or preserving some elements of the active scene.  For this example, we'll just start from scratch and use New.

Note that in this box the name of the scene can be edited at any time.  Explore some of the other functions for creating new scenes.  Linking or making copies could be very beneficial depending on what you are trying to achieve.

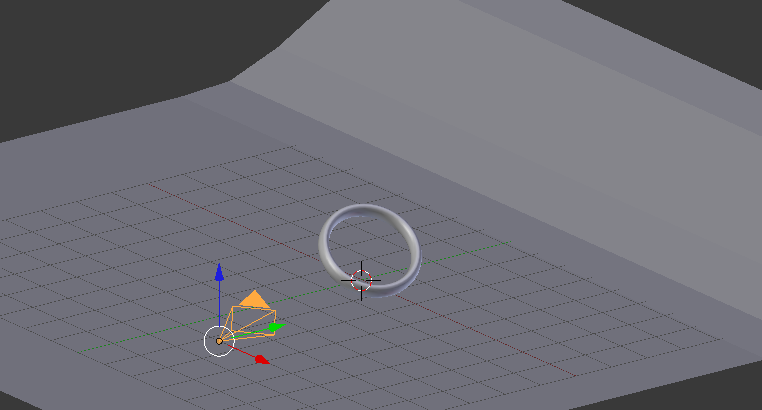
As for my new scene, note that a new scene was created which I called NewScene_Sphere.  As well I added a sphere to the scene.  Note that when creating a new scene from scratch, there is no default light or camera added.

Friday, December 28, 2012

Render Layers

This entry covers the use of Render Layers.  Although there are probably many uses for Render Layers, the main focus I'll cover is using them to isolate post processing control to individual objects of the scene using the compositor.

So in my initial scene, I have Suzanne and a light blue backdrop.  In an effort to use Render Layers, I have Suzanne on layer 1, the backdrop on layer 2 and the light on layer 3.

Wednesday, December 14, 2011

HDRI Lighting

This tutorial covers lighting a scene using an HDRI image.  Technically any image can be used, but the term that is commonly used for this is referred to as HDRI.  Essentially, what works best is a seemingly 360 pano image.  It doesn't have to be HDR.  

So to setup the scene, first remove any lamps, unless you desire extra light on top of what will be provided by the scene.

Select the world tab, and make the following parameter changes.

Next download an 'HDRI' image that you find online.  The following one is suitable for this application.  


Next, select the camera and add a texture to it.  Apply the following settings to the new texture, loading in the HDRI image you found.

 Upon rendering the scene, you'll notice now that the entire scene is lit based on the luminance and color of the pixels as applied to a sphere around the world.

If we apply a reflective material to the ring, we now have a gold looking shiny ring, with seemingly meaningful and realistic reflections applied to it.  This works well for very realistic scenes with reflective objects.

Wednesday, June 20, 2012

OpenGL Render

This entry covers a quick tip on faster rendering, specifically as it pertains to faster (draft) rendering.  By using OpenGL Rendering, Blender uses the view that you see in the viewport, but with your camera to render a light weight version of your scene.  

In most cases this is most applicable to animation.  If your scene takes forever to render, or if your animation plays slowly in the viewport, you can do a fast render without changing any render or object settings.  

First we'll start with a reasonably detailed scene, with some smoothed monkeys and a textured floor.  

If we perform an OpenGL render of the scene, notice the camera view is the same, but the lighting and the textures are missing (as seen in the viewport).

This type of render can be found at the top left near the top level menu under the Render menu.  Use the OpenGL Render Image to render the current frame, and OpenGL Render Animation to render your entire animation.

Below is the short clip of an animation generated from the OpenGL render.

Monday, December 26, 2011

Emmissive Image

This entry will show how you can create a light source from a texture in the Cycles renderer.  For this example, I'll create a very rudimentary moonlit ocean scene.  To start off, I downloaded and modified a nice image of a full moon.  The moon will be the light source in the scene.

Next I modeled the scene as a series of deformed planes to make the ocean, and a simple plane as the backdrop.  I used the Image to Plane add-on to get the right dimensions of the background.

For the material of the background I selected Emission, and then for the color selected Image Texture.  From here I was able to select my night moon image, and increase the strength a little bit.

The final rendered scene, with the moon acting as the sole light source, save for the background lighting color which I made a dark blue (to color the water).


Saturday, September 14, 2013

Invisible Emissive Material

In the Cycles renderer, let's assume that you want to light your scene with an emissive mesh, however, that mesh is in the way of how you want to view the scene.  Hiding the mesh will also remove the light effect, so we need to make the object invisible to the camera, but still light the scene.

With the emissive object selected, in the Object panel, under Ray Visibility, uncheck the Camera box.

Thursday, March 22, 2012

The Grease Pencil

The Grease Pencil is a very simple tool in Blender that has many useful applications.  In its simplest form, it just provides the ability to draw in the 3D View.  However, this can be useful for explaining, storyboarding, quick animating, etc.  

We'll go through some of the features and some of these applications.

The Grease Pencil is always available in the Tools [T] menu on the left side of the 3D View.  To begin drawing at any point, any of the four modes: Draw, Line, Poly and Erase can be selected.  This will allow you to make one stroke.  If Use Sketching Session is selected, then a new layer will be created and you can make many strokes.

The commands for these modes are:

  • Draw: D + LMB
  • Line: Ctrl + D + LMB
  • Poly: Ctrl + D + RMB
  • Erase: D + RMB
  • Exit: Esc


In the Properties Panel [N], to the right of the 3D View, are more parameters that can be adjusted.  When you select Use Sketching Session, a new layer is created.  In this case, it is called GP_Layer by default.

In the panel above, note that there are four different Drawing Settings.  These each affect the scene differently as will be shown below.  Four different marks were made, each with a different drawing setting.

Note that when the scene is moved, their characteristics are revealed.

  • Cursor/Stroke:  Draws within the scene, but not on meshes.
  • Surface:  Projected onto mesh in the scene (does not move with mesh though)
  • View:  Static in the 3D view

Note that X-Ray is turned off so that's why you can't see the lines through the mesh.

Finally, another common method for employing the Grease Pencil is to sketch out a simple animation.  The drawings created are all tied to specific frames.  So each frame can have its own drawing.  These can be animated if the timeline is played.  As well, to facilitate animating, the Onion Skinning option is available in the Properties Panel, which, as shown below, allows you to see lighter traces of the previous frames (also designated in the panel).

Saturday, June 8, 2013

Object Display Attributes

This entry will overview the different Display properties in the Object panel.  Many of these are best understood through experimentation, but some are easier to understand with description.


Friday, March 22, 2013

Multi-View Render

Suppose that you desire to render two scenes into a single image (render).  This normally can be done in photoshop, or if it's a video, a video compositor.  However, if for some reason you want to do it all in Blender, it can be done.

For this entry we'll explore how to take the two following scenes:


...and render them into a single image side by side.  This approach can be used for stereoscopic rendering, or to do a dual view render, or just to combine two different scenes in a juxtaposed fashion.

Wednesday, December 21, 2011

Mist

The Mist attribute within the World settings allows you to add a gradient mist or fog to your scene based on where your camera is facing.  In showing how this works, I'll use a scene generated with the Suicidator City Generator.

At first render without the Mist, I've applied environmental lighting and a very light gray sky color, commensurate with a very over-cast (seemingly) foggy day.  The fog will be added by the mist.

Now enable Mist within the World properties panel. See the image below for a visual explanation of how the mist works.  I typically start with a very low Start value and a very low Depth value, and adjust as necessary till the scene looks correct.

From the diagram below, you can see that the Start is the point from the camera which the mist begins, and the depth is the z-distance in which the fog becomes thicker with respect to the Falloff relationship specified.

The final render with the Mist enabled gives a very nice foggy feeling, almost San Francisco style. There isn't even a need to try to put anything else in the background as the fog seems to absorb it all.


Friday, January 6, 2012

HDRI Image Lighting in Cycles

This entry essentially shows the steps of creating environmental lighting for a scene using an HDRI image.  This is the same concept as is introduced in this entry HDRI Lighting, however, you'll quickly note that this is much easier and simpler to do with the Cycles render engine.

So we start off with a simple scene with a smoothed sphere.

In the World tab, simple select Environment Texture for the Color, of the Background.  Select the desired HDRI image, and that's it.

Now that image will render as both lighting and the background for the scene.

HDR Sphere Image

There will be times when you want or need to use environmental lighting (rather than Blender light source), and therefore will need an HDR image.  Many scene type HDR images can be found online, but there may be times when you want an image of a specific scene.

Typically this would be achieved by taking a series of photos where the camera is rotated (ideally) around the the central node of the lens.  These images would be stitched together to create a 360 panorama.  This option isn't always available. 

Another simple approach that would give you a 180 degree solution is to use a mirror ball (or christmas ornament), and do some manipulation.  This entry will show how to convert a mirror ball image into a rectangular background which could be used in blender for lighting, such as Cylinder Lighting, or HDRI Lighting.

So first we start out with a mirror ball-like image.


The program of choice is to use HDR Shop, which can be found here: http://www.hdrshop.com/

Load the image in this program, and it should look something like below.

Next, open the Panoramic Transformations dialog.

Apply these changes and hit OK.

Next, open the same dialog, and now apply the following changes, and hit OK.

Now the image should be nicely unwrapped to a 180 degree pano of the scene.


Monday, April 14, 2014

Shadows Only

There are many situations where it would be helpful to only render the shadows received upon an object rather than the whole material itself.  There is a simple way to do this within Material>Shadow section, shown below.  Simply check the Shadows Only box.


Sunday, December 11, 2011

Image as Plane

This entry shows how to use the Image as Plane Add-on.  This is a very convenient tool to use when creating backgrounds or simple posters, etc.  The add-on is built into blender, so you just need to search for it in the add-on library in User Preferences, and enable it.

Once it's enabled, you can make use of it through the standard Import menu.

Select an image from the file system, and you can apply a few settings in the bottom left menu.  Shadeless prevents lighting in the scene from affecting the image/plane.  And make use of the image dimensions will maintain its original look once the plane is created.

When imported a plane will be added to your scene that will already have that image as a texture.  For this example, i took a pot of flowers I made (as a rendered image), and imported that as a plane.  I also added a few spheres in the scene as a foreground object.

The final render with both the background image of flowers, and the spheres in front.

Wednesday, March 14, 2012

Shadeless

Rendering an object with a Shadeless material essentially allows the full color of the color or texture to visible, without any interaction with the rest of the lighting in the scene.   This is most often used in cases of background images, and with creating color masks within a scene.

In the Blender Internal this is done quite simply by checking the Shadeless box in the Material tool palette (as seen below).

In Cycles, it is a little more cumbersome, and the node setup (below) must be used.  Essentially what's going on here is that the material is set to Emmissive, but to prevent it from lighting other objects in the scene, the light paths are isolated to only casting toward the camera.