Friday, December 28, 2012

Alpha Over Node

This quick entry covers the compositor node setup for adding a background image to a scene using the compositor.  The node setup is seen below.  It uses the AlphaOver node.  The only caveat i noticed is that the overlaid object (my cube) must be on the lower image input, and the Premul value set to 1.0.

The final render shows the standard cube in front of the image i imported (chairs).

Render Layers

This entry covers the use of Render Layers.  Although there are probably many uses for Render Layers, the main focus I'll cover is using them to isolate post processing control to individual objects of the scene using the compositor.

So in my initial scene, I have Suzanne and a light blue backdrop.  In an effort to use Render Layers, I have Suzanne on layer 1, the backdrop on layer 2 and the light on layer 3.

Compositor Intro

This entry is an introduction to the Compositor.  I'll go over the Compositing View as well as the standard output nodes that are used.

To start off, using [Ctrl + Left Arrow], you can change to the compositing view which should look like the image below.  My example scene is suzanne within a light blue box.

Friday, December 7, 2012

No Shadow Object

This quick tutorial just shows how to render your material without casting a shadow.  This only applies to the Blender internal renderer materials.


Simply uncheck the Traceable checkbox.  Now, the mesh should not cast a shadow on other objects.

Python Smoothing

This tutorial entry will show how to script in the sub-surface modifier and the smooth_shader operator.  Note that the following code would be used within an Operator.  For simply performing these operations on an already selected object, see the Python Macros entry.

# add a subsurf modifier, setting level to 2
ssMod = obj.modifiers.new("MyName", type='SUBSURF')
ssMod.levels = 2

# set a selected active object (operations must be in this order)
obj.select = True
bpy.context.scene.objects.active = obj

# add smooth shading
bpy.obs.object.shade_smooth()

Scripting Externally

There are a handful of reasons not to script using the internal script editor built into Blender.  One of the main reasons is undo-ing.  If you undo, something in your scene while testing, it will also undo the last set of edits you made to your script.  This may not be obvious and you'll find yourself re-typing scripts sections over and over again.

Helper Script
The suggested method is to edit your scripts externally, and use the following script to run it in your Blender scene.

import bpy
import os

filename = os.path.join(os.path.dirname(bpy.data.filepath), "my-script-name.py")

exec(compile(open(filename).read(), filename, 'exec'))

Friday, November 30, 2012

Basic Operator

This entry covers scripting a basic Operator in Blender.  An operator essentially is an operation which can be performed in/on your project.  Some existing examples are Smooth Shading, or moving objects in the scene. The move operator is one of many ways of integrating custom functionality (or add-ons) into Blender.

For this example, I'll just show a conventional "Hello World" approach.  Below is an example of all the basic code required for a custom operator.


Wednesday, November 21, 2012

Curve Handles

This entry covers the details of the types of Curve Handles.  The type of curve handle affects how the curve will be shaped with respect to the other handles.  There are four types, and we'll cover each of them and how they behave.

Before we begin, note that a single curve can have multiple curve points (hence multiple handles) and each curve point can have a different handle type.

The first handle we'll describe is the Free handle.  All curve points have three selectable points on them.  The center of the curve point, and the ends of the curve handles.  In the Free mode, the ends of the curve handles can be manipulated independent of each other.  This can product a sharp point at the curve point.

Mesh of a Curve

This entry will cover the function of both displaying the wireframe of a curve solid over the solid view.  This makes it easier to adjust the level of detail or resolution in the mesh of the curve.

For this example, we'll start with a curve solid that is generated by assigning a circle curve as the bevel to a the standard bezier curve.  Extrude along Curve


Friday, November 16, 2012

Instance Along Curve

This entry covers the concept of duplicating a mesh (cube in this example) along the path of a curve.  This is a very useful animation ability when trying to grow a curvey line or path.  

To start off you'll need at add [SHIFT+A] a curve and a mesh (cube).  It is worth noting that the direction of the curve matters for this example.  To have the cube follow the path of the curve directly, you'll want to situate it at the beginning (curve arrows are pointing away from cube) of the curve.

Monday, November 12, 2012

Python Macros

This entry covers the creation of Python Macros.  These are basically the same as python scripts, however these are much simpler scripts that encapsulate actions.    In this example we'll show how you can combine the action of adding a Sub-Surface Modifier along with the Smooth Shader operation.  An example macro can be seen below.

Saturday, November 10, 2012

Copying Attributes

This quick entry covers the Copy Attributes Add-On.  This simple add-on allows you to take the transform (and many other attributes) of an object, and apply it to another object.  So first, enable the add-on through the user preferences menu.


Python Interpreter

This entry will be the starting point for any and all Python Scripting in Blender.  What's nice is that Blender also installs a full fledged Python interpreter/compiler so you can test regular python scripts (not just Blender ones) in this environment.

Blender has a view dedicated to Python Scripting which can be found by [Ctrl + Left] or by selecting Scripting from the drop down menu at the top.  The scripting view looks like the image below.


Tuesday, October 30, 2012

New Blog with Blender Capabilities

This new blog will focus on commercial-off-the-shelf (COTS) technologies relating to 3D modeling capabilities.

http://3dcots.blogspot.com/

Saturday, October 13, 2012

Active Camera Switch

This quick entry covers the function of switching the 'active' quality of a camera in a scene where there are multiple cameras.  With the desired camera selected press [Ctrl+NUM0].  This will set the selected camera as the 'active' camera, therefore, when you render [F12] or when you assume camera view [NUM0] it will use that active camera.

Scale along Normals

This quick entry covers the idea of scaling along the normals of a mesh rather than the standard scaling method.  The quick key for this action is [Alt+S] while in Edit Mode.  

But to explain its use, consider a taurus:

Thursday, September 27, 2012

Transparent Mask - Cycles

This tutorial is similar to the material mask, however this approach makes use of an alpha (transparency) channel built into the texture (i.e. PNG with RGBA) that will be overlayed.  In this case the red splatter (from here on referred to as blood) is an image with a transparent background.  We will be overlaying this onto a wooden plank texture.


Saturday, September 22, 2012

Export Transparent PNG

This is a quick tutorial on how to render an image with a transparent background.  The idea behind it is that anything that isn't modeled, essentially all parts of the "sky" that are rendered will be rendered as transparency in the PNG.  I'll go over both methods for Cycles and Blender Internal.

For Cycles, set the PNG format to RGBA, and way down in the Film panel enable Transparent.  

For Blender Internal, again set the PNG format to RGBA, but this time set the alpha in the Shading panel to Premultiplied.

When you render, the sky should be black, and when you save the image it will be transparent, as shown with the basic cube setup.

Light in Glass - Cycles

For this entry, we'll go over a trick for having a light shine through glass efficiently in Cycles.  For this example, we'll have a simple setup of a oval sphere emitting from inside a regular sphere (which has the glass material), and a torus around it to receive the light through the glass.

When normally just applying a Glass material to the sphere, the problem arises that the light cast on the surrounding area is very noisy.  This is due to the fact that Cycles is trying to do a lot of intense math to try to get the lighting realistic.  This method of rendering can take a very very long time.

The quick trick is to use the LightPath node combined with a Mix Color node set to Add and a Factor of 1.0.  When combining this with a Transparent Shader, the resulting render is one where the light coming from the emitter is correct as it passes through the glass to the camera, but for the light that passes through the glass to the rest of the environment, it's as if the glass isn't there, leaving much faster rendering times and much cleaner image.

New render with this more sophisticated node setup.

Friday, September 21, 2012

Material Mask - Cycles

This entry will cover the function of creating a material mask using an image texture.  Our starting model is a simple sub-surfaced cylinder with a uv-mapped texture on it.


Using the following material node setup, we essentially are taking a second texture and masking out parts based on luminance.  A bright magenta is used to show what would normally be another texture showing through.  The ColorRamp node converts the output of the texture to black and white, while the sliders allow you to control what parts of the texture will show through.

An example of the cylinder now masked showing some magenta areas through.

Taking this node setup further, the output from the ColorRamp can be fed into a Mix Shader to also act as a mask for another shader (in this example a Glossy Shader).  A Mix Color node must be placed in between to control the strength of the second shader.  The second color of the Mix Color node must be set to black, acting like a scale between black and the full white from the ramp.

The result of this setup is as shown below, where the glossy is only affecting the areas that are masked per say.

Wednesday, June 27, 2012

Border Render

This entry covers the ability to render only part of the scene.  In the render tab, by checking the box labeled Border, this enables the ability to designate a rectangle within the camera view to restrict the rendered area (speeding up render times) if you are only working on a small part.


Once the box is checked, pressing [SHIFT+B] will enable a box select that will work in the camera view [NUM 0].

At this point, rendering [F12] will only render the area drawn in the red dotted box.  If you check the Crop box, the black border representing the rest of the image won't be drawn.


Saturday, June 23, 2012

Scenes

This quick entry covers creating new and deleting Scenes.  In most cases have one scene will suffice, except perhaps if you are trying to contain a small movie in a single blend file and you want to have different scenes with unique models, lighting, world data, etc and Layers won't suffice.

In this example, we start off with the default scene which generally comes with the following objects:

In the primary menu system in the upper left, you can find a box as shown below.  Clicking on the plus button will allow you to create a new layer, either from scratch, or preserving some elements of the active scene.  For this example, we'll just start from scratch and use New.

Note that in this box the name of the scene can be edited at any time.  Explore some of the other functions for creating new scenes.  Linking or making copies could be very beneficial depending on what you are trying to achieve.

As for my new scene, note that a new scene was created which I called NewScene_Sphere.  As well I added a sphere to the scene.  Note that when creating a new scene from scratch, there is no default light or camera added.

Wednesday, June 20, 2012

OpenGL Render

This entry covers a quick tip on faster rendering, specifically as it pertains to faster (draft) rendering.  By using OpenGL Rendering, Blender uses the view that you see in the viewport, but with your camera to render a light weight version of your scene.  

In most cases this is most applicable to animation.  If your scene takes forever to render, or if your animation plays slowly in the viewport, you can do a fast render without changing any render or object settings.  

First we'll start with a reasonably detailed scene, with some smoothed monkeys and a textured floor.  

If we perform an OpenGL render of the scene, notice the camera view is the same, but the lighting and the textures are missing (as seen in the viewport).

This type of render can be found at the top left near the top level menu under the Render menu.  Use the OpenGL Render Image to render the current frame, and OpenGL Render Animation to render your entire animation.

Below is the short clip of an animation generated from the OpenGL render.

Saturday, June 16, 2012

Build Modifier

This quick entry demonstrates the Build Modifier.  It is very simple and has a neat animation effect.  When added, you'll first notice that your mesh disappears.  This is because all the vertices are hidden, and will be sequentially revealed when the animation is played [ALT + A].

In the properties panel, there are a few controls.  The Start and Length are used to control the timing and length of the animation, and the Randomize allows the sequence of vertices to appear randomly.  

To demonstrate this neat effect, I downloaded a motorcycle from Blend Swap, combined all the separate parts into a single mesh by joining [CTRL+J], and added this modifier.  Since I didn't use the Randomize function, the mesh built in a semi-ordered path, and so I tried to follow that path with the camera.

Wednesday, June 13, 2012

Curve Path

This entry will cover the use of a Curve called a Path, which can be used to guide an object to follow along its path.  A very obvious application for this is to create a roller coaster, which we will do for this example.

First add [SHIFT+A] a Path through the add Curve menu.  In Edit Mode [TAB], you can manipulate the curve by moving the control handles and extruding [E] points as necessary.  A vague idea of the shape of my coaster can be seen in the image below.

Next is the process of adding an object to follow the curve.  In this case I'll be using the Camera so that I can view a first person perspective of riding along the path.  Joining the two is done by parenting the object (i.e. Camera) to the curve, selecting both and [CTRL+P], and selecting Follow Path.

The time of the animation created by this can be controlled in the curve properties panel on the Path itself.  By default the animation length is 100 frames.

Note that the point at which the following object (camera) is attached to the curve will be based on the animation frame that is selected.  If frame 1 is selected, that will be connection reference point for the camera.

For fun, I created another curve in the shape of a slice of the track to give the track a physical presence.  The curve can be seen highlighted in the image below.

To apply it to the curve, select it in the Bevel Object box of the Geometry section in the Curve properties.

Finally, adding some support poles and a base floor, the track is complete, and the animation of the roller coaster can be run.  Note at certain curve points, the orientation of the following object may rotate, and so correction may be necessary with keyframes [I] on the following object.

Video of the roller coaster animation.

Saturday, June 9, 2012

Edge Glow

This entry covers a unique material that was created by the folks at CGMasters:  CG Masters Website.  They refer to it as a falloff technique.  The node setup can be seen below.

I tried it on Suzanne, but was only successfully able to recreate the effect using the node setup rather than just the ramp settings in the right panel.
Also, note that to get this edge glow effect, I had the scene only lit by Environment Light.  I didn't have any active lamp in the render.

Friday, June 1, 2012

MDD Import/Export

This entry covers the use of the MDD export/import plugin to simplify control of developed animations.  This format essentially takes the all the animation aspects of the mesh, whether generated by transforms or by lattices, and embeds it within the mesh as a sequence of shape keys.  

This can be very useful for performing sequences, or just handling the animation as a part of the mesh.

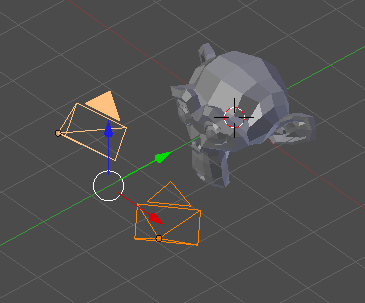
To start out, I have a simple animation of a cube that involves translation, scale and rotation.  Ultimately I'd like to make a sequence of cubes perform this animation with time-offsets.
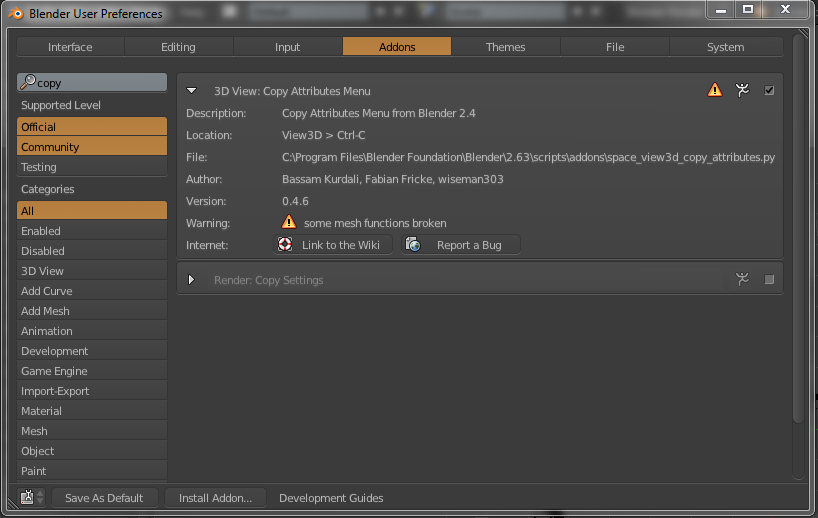
The very first step is to add or enable the MDD plugin in the User Preferences menu under AddOns.

Next, once the animation is complete, make a copy of the mesh [SHIFT+D] and move it to another layer.  Also, remove all animation or influences (modifiers) that cause animation on the mesh.

Next select the original mesh that has all the modifiers and animation still connected to it and export as an MDD file format.  This is the equivalent of saving the Geometry Cache File, or Point Cache File.

Be sure to set the export parameters according to your animation, specifically noting Frames Per Second and the End Frame.

Once the MDD is saved, back in viewport switch to the layer with the duplicate (with all animation effects removed).  Now go to File>Import and import the MDD just saved.

You should now observe both in the timeline and the timeline and in the object Vertex panel that there are a set of Shape Keys for every frame attached to the mesh.  The animation will be available in full, but the orientation will be incorrect.

The first step to correction is to select the Basis key (the first one) and 
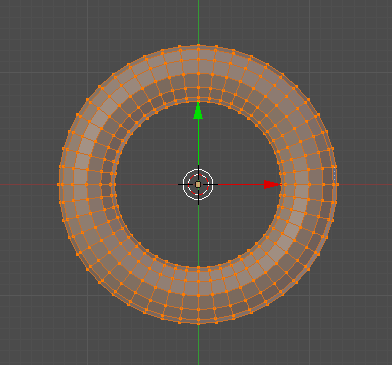
uncheck Relative, and then select all the vertices in the object in Edit Mode, and rotate those vertices collectively 90 degrees in the x-axis.  (this is a correction for Y vs Z being the up axis.)

Once this is done, you can re-check the Relative box in the Shape Keys view.

A final Scale of -1 may also be necessary pending on the animation.

Once the orientation is set correctly, the control of the timing of the animation can be manipulated in the NLA Editor, and the mesh can be duplicated as many times as desired while maintaining its animation.