Wednesday, June 27, 2012

Border Render

This entry covers the ability to render only part of the scene.  In the render tab, by checking the box labeled Border, this enables the ability to designate a rectangle within the camera view to restrict the rendered area (speeding up render times) if you are only working on a small part.


Once the box is checked, pressing [SHIFT+B] will enable a box select that will work in the camera view [NUM 0].

At this point, rendering [F12] will only render the area drawn in the red dotted box.  If you check the Crop box, the black border representing the rest of the image won't be drawn.


Saturday, June 23, 2012

Scenes

This quick entry covers creating new and deleting Scenes.  In most cases have one scene will suffice, except perhaps if you are trying to contain a small movie in a single blend file and you want to have different scenes with unique models, lighting, world data, etc and Layers won't suffice.

In this example, we start off with the default scene which generally comes with the following objects:

In the primary menu system in the upper left, you can find a box as shown below.  Clicking on the plus button will allow you to create a new layer, either from scratch, or preserving some elements of the active scene.  For this example, we'll just start from scratch and use New.

Note that in this box the name of the scene can be edited at any time.  Explore some of the other functions for creating new scenes.  Linking or making copies could be very beneficial depending on what you are trying to achieve.

As for my new scene, note that a new scene was created which I called NewScene_Sphere.  As well I added a sphere to the scene.  Note that when creating a new scene from scratch, there is no default light or camera added.

Wednesday, June 20, 2012

OpenGL Render

This entry covers a quick tip on faster rendering, specifically as it pertains to faster (draft) rendering.  By using OpenGL Rendering, Blender uses the view that you see in the viewport, but with your camera to render a light weight version of your scene.  

In most cases this is most applicable to animation.  If your scene takes forever to render, or if your animation plays slowly in the viewport, you can do a fast render without changing any render or object settings.  

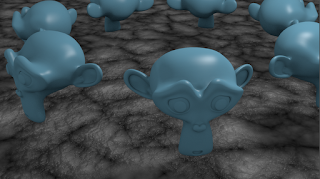
First we'll start with a reasonably detailed scene, with some smoothed monkeys and a textured floor.  

If we perform an OpenGL render of the scene, notice the camera view is the same, but the lighting and the textures are missing (as seen in the viewport).

This type of render can be found at the top left near the top level menu under the Render menu.  Use the OpenGL Render Image to render the current frame, and OpenGL Render Animation to render your entire animation.

Below is the short clip of an animation generated from the OpenGL render.

Saturday, June 16, 2012

Build Modifier

This quick entry demonstrates the Build Modifier.  It is very simple and has a neat animation effect.  When added, you'll first notice that your mesh disappears.  This is because all the vertices are hidden, and will be sequentially revealed when the animation is played [ALT + A].

In the properties panel, there are a few controls.  The Start and Length are used to control the timing and length of the animation, and the Randomize allows the sequence of vertices to appear randomly.  

To demonstrate this neat effect, I downloaded a motorcycle from Blend Swap, combined all the separate parts into a single mesh by joining [CTRL+J], and added this modifier.  Since I didn't use the Randomize function, the mesh built in a semi-ordered path, and so I tried to follow that path with the camera.

Wednesday, June 13, 2012

Curve Path

This entry will cover the use of a Curve called a Path, which can be used to guide an object to follow along its path.  A very obvious application for this is to create a roller coaster, which we will do for this example.

First add [SHIFT+A] a Path through the add Curve menu.  In Edit Mode [TAB], you can manipulate the curve by moving the control handles and extruding [E] points as necessary.  A vague idea of the shape of my coaster can be seen in the image below.

Next is the process of adding an object to follow the curve.  In this case I'll be using the Camera so that I can view a first person perspective of riding along the path.  Joining the two is done by parenting the object (i.e. Camera) to the curve, selecting both and [CTRL+P], and selecting Follow Path.

The time of the animation created by this can be controlled in the curve properties panel on the Path itself.  By default the animation length is 100 frames.

Note that the point at which the following object (camera) is attached to the curve will be based on the animation frame that is selected.  If frame 1 is selected, that will be connection reference point for the camera.

For fun, I created another curve in the shape of a slice of the track to give the track a physical presence.  The curve can be seen highlighted in the image below.

To apply it to the curve, select it in the Bevel Object box of the Geometry section in the Curve properties.

Finally, adding some support poles and a base floor, the track is complete, and the animation of the roller coaster can be run.  Note at certain curve points, the orientation of the following object may rotate, and so correction may be necessary with keyframes [I] on the following object.

Video of the roller coaster animation.

Saturday, June 9, 2012

Edge Glow

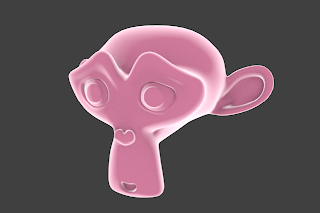
This entry covers a unique material that was created by the folks at CGMasters:  CG Masters Website.  They refer to it as a falloff technique.  The node setup can be seen below.

I tried it on Suzanne, but was only successfully able to recreate the effect using the node setup rather than just the ramp settings in the right panel.
Also, note that to get this edge glow effect, I had the scene only lit by Environment Light.  I didn't have any active lamp in the render.

Friday, June 1, 2012

MDD Import/Export

This entry covers the use of the MDD export/import plugin to simplify control of developed animations.  This format essentially takes the all the animation aspects of the mesh, whether generated by transforms or by lattices, and embeds it within the mesh as a sequence of shape keys.  

This can be very useful for performing sequences, or just handling the animation as a part of the mesh.

To start out, I have a simple animation of a cube that involves translation, scale and rotation.  Ultimately I'd like to make a sequence of cubes perform this animation with time-offsets.
The very first step is to add or enable the MDD plugin in the User Preferences menu under AddOns.

Next, once the animation is complete, make a copy of the mesh [SHIFT+D] and move it to another layer.  Also, remove all animation or influences (modifiers) that cause animation on the mesh.

Next select the original mesh that has all the modifiers and animation still connected to it and export as an MDD file format.  This is the equivalent of saving the Geometry Cache File, or Point Cache File.

Be sure to set the export parameters according to your animation, specifically noting Frames Per Second and the End Frame.

Once the MDD is saved, back in viewport switch to the layer with the duplicate (with all animation effects removed).  Now go to File>Import and import the MDD just saved.

You should now observe both in the timeline and the timeline and in the object Vertex panel that there are a set of Shape Keys for every frame attached to the mesh.  The animation will be available in full, but the orientation will be incorrect.

The first step to correction is to select the Basis key (the first one) and uncheck Relative, and then select all the vertices in the object in Edit Mode, and rotate those vertices collectively 90 degrees in the x-axis.  (this is a correction for Y vs Z being the up axis.)

Once this is done, you can re-check the Relative box in the Shape Keys view.

A final Scale of -1 may also be necessary pending on the animation.

Once the orientation is set correctly, the control of the timing of the animation can be manipulated in the NLA Editor, and the mesh can be duplicated as many times as desired while maintaining its animation.